 |
 |
|
 |
 |
 |
|
| |
| This tutorial will show you how
to use the Anfy wizard with many examples. If you would
like to start making Anfy objects quickly, read the quick
start guide. |
| |
| 0.
Preparation. |
|
Before starting the program, you first have
to unpack the archive anfy14en.zip and install the
program. To do this, you are only required to click the Setup.exe
in the Anfy folder. By default, the installation wizard
lets you install the program into "c:\Program Files\Anfy
Team\Anfy" folder. Change the destination folder
if necessary, and finish the installation. Now you have added
the shortcut to Start menu and are ready to use the program!
|
| |
| 1.
Brief note for the basic procedure |
|
I have described the
fundamental procedure of creating Anfy objects in
the quick start section, and I will not repeat the same content
again. So, let me summarise the procedure very briefly.
(1). Applet selection menu.
The wizard provides you 5 or 6 sessions for
each applet. First you choose a desired category and next
an applet within it. When this has done, go to the next session
by clicking "next".
(2) Applet parameter menu.
Set all the parameters, except some optional
ones. Then click "next" .
(3) Textscroll menu.
This session only appears when you selected
"Enable textscroll" parameter in the previous session.
Otherwise, the wizard skips this session. When you have finish
this session, click "next" to proceed.
(4) Expert menu.
You can optimise applet speed now. General
browser statusbar message and foreground image can be set
during this session. However, if you are editing a menu applet,
statusbar message parameter here may be ignored.
(5) Regcode menu.
Only registered users enter the regcodes for
their sites. Non-registered users must skip this session.
(6) HTML output menu.
You will output what you have edited by now.
Specify the output HTML document and its folder, or copy the
HTML code and use it with your favourite HTML editor.
|
| |
| 2.
Applet selection menu. |
| Anfy 1.4 comes with 40
applets. For your ease, these are categorised into 5 as follows: |
| |
|
Category
|
Applets
|
| Banner/Slideshow |
bookflip,
cfade, mosaic |
| Fractal/A-Life |
flozoids,
ifsfract, life2D, mandel |
| Image
effects |
anfysnow,
bump, deform, fireworks, huerot, lake, lens, rot, warp,
water, wobbler |
| 3D Applets |
anfy3D
light, fluid, galaxy, tmapcube, tunnel, tunnel 3D, voxel,
wormhole |
| Navigational
menu |
cubemenu,
morphmenu, treemenu, wheelmenu |
| Others |
anfycam,
anfypaint, blobs, blur, fire, flag, flagload, plasma,
solidscroller, textscroller |
|
| |
 |
The left is the actual copy of
the applet selection menu. While applet names tell you a little
about them, you can always preview the selected applet with
the default browser. |
| Or, "preview all"lets
you preview all the applets. |
| |
| 3.
Applet parameter menu. |
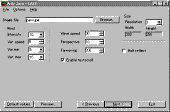 |
For each applet,
this session displays a different menu. Even so, some parameters
such as "applet size", "resolution",
"enable textscroll" appear again and again.
|
|
Please consult each applet's tutorial for
more information. Suppose that you select "enable
textscrtoll" during this session, then, textscroll
menu appear next.
|
| |
| 4.
Textscroll menu |
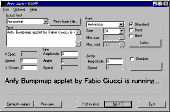 |
Textscroll
menu includes several parameters and some of them only
work when you choose a particular scroll type. |
|
|
For example, "V.Space"parameter
is locked when you select "horizontal" scroll.
On the contrary, if you select "vertical" scroll,
"Y Offset" parameter is locked, while you
can define "V.Space" parameter.
Although this sounds complicated, in actuality,
you should only select what are selectable in the wizard.
In the following discussion, suppose that
all parameters are selectable, although that would never be
true in actual situation.
|
 |
First, choose a scroll
type of text and type your desired text in the text field. There
are four scroll types: |
|
horizontal, vertical, zooming, and
invzooming. You can also import text data from existing
documents.
By clicking "Text from file..."button,
file selection window will open, and ask you to choose a text
file for import. Remember, it must be an ASCII file.
|
 |
Next, decides
the precise animation by setting these three parameters
seen left. "V.Space" stands for "vertical
spacing"of text lines. |
|
This will not work unless you select
"vertical" scroll. "Speed"
parameter defines how fast the text scrolls or sometimes
zooms and works finely in all scroll types.
The value for "Y Offset"
is the vertical position of the text. This is measured
from the top.
|
 |
Next motion
related parameter is a set of sine curve parameters. These
are meaningful only if you select "horizontal"
scroll. |
|
With these parameters set, you can produce
a waving line of text which scrolls from right to left.
"Amplitude" is the amplitude of the wave.
Well, it decides high wave or low wave.
"Angle" may be a misleading
name. It defines a cycle of a waving. When the value
for "Angle" is low, the distance between
wavings is wide. If it is higher, the distance will
be narrower. Finally, "Speed" here represent
the speed of waving.
|
 |
Another
motion related parameter is a set of "Jump"
parameters. They are enabled only when you select
"horizontal" scroll. |
|
|
Plus, jumping movement is exclusive
to sine movement. If you select both, sine movement
would function and jump movement be ignored.
Here, "Amplitude" decides
how high the text line jumps and "Speed"
decides its timing.
|
| Next, we will discuss about the parameters
which define how the text looks. |
 |
You now
choose a font, size, colour and shape of the font.
|
|
|
By default, you select one font from
Courier, Helvetica, Dialog, Times Roman. These are
standard fonts and even if you want to type in non-Latin
letters, such as Japanese, Greek and Hebrew, these four
fonts can be used.
This is achieved by automatically, so
you don't really have to set non standard fonts
in any circumstances, however, by unchecking "standard"
box, you are allowed to select one from all the available
system fonts.
Note.
Using non-standard fonts causes unexpected
results in other people's systems. When you do thits,
you must be aware of what you are doing.
Only when you select "zooming"
or "invzooming" scroll, "Min.
size" and "Max. size" of the font are
selectable.
With these two parameters, you can configure
how your text zooms in and out. Plus, normal text "Size"
parameter would be ignored, when you select "zooming"
or "invzooming".
|
|
 |
Another font related parameter
is "shadow" parameter. This literally decides
the shadow of the font. If you do not need shadowed letters,
leave this unselected. |
|
|
Appendix:
|
| |
| 5.
Expert menu. |
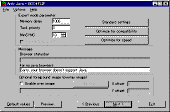 |
Next session is Expert menu. This includes
applet speed control, browser statusbar message, non Java™
enabled browser message and optional foreground image
selection. |
|
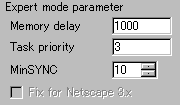 |
With these three parameters
on the left, you can configure how applets affect on CPU
and memory consumption. |
|
There are three pre-set values for them, i.e.:
Standard settings, Optimise for compatibility,
and Optimise for speed.
By selecting one of them, you can avoid
manual editing of the parameters. Let me present you
a diagram which shows the relationship between values
of these parameters and actual running speed of applets,
and CPU intensiveness.
|
| Parameter |
Value
|
Speed
|
CPU intensiveness
|
| Memory
delay |
high
|
high
|
high
|
| Task
priority |
high
|
high
|
high
|
| MinSYNC |
low
|
high
|
high
|
It is important to select less CPU intensive
values all the time, so that visitors on your site would not
be sick! :)
|
 |
| Type in browser statusbar message
above column and non Java™ enabled browser message
below. |
|
|
| When you mouseover
the applet, the statusbarmessage set here will be displayed.
Needless to say, non Java™ enabled browser cannot display
applets. Instead, the message set here will be shown. |
 |
|
Next, if you need an image layered over the
applet, select "Enable overlay image" and
specify an image file.
Then, position it by filling X offset
and Y offset parameters. Both are measured from the
top left corner.
|
| |
| 6.
Regcode menu. |
 |
Now, you are in the
regcode menu. This applies only to registered users. Unregistered
users should skip this session. |
|
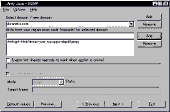
First, type in your domain in the Select
domain/new domain field, and click "Add".
This will record your domain in your HD. Next, while selecting
the domain, write the respective regcode below., And click
"Add".
If you own multiple domains, repeat this procedure.
Of course, you can always remove wrong domains or regcodes.
|
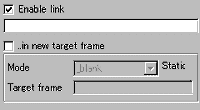 |
After you add
the regcode, link parameters are enabled. |
|
|
If you would like the applet to be linked
to a certain url, select "Enable link" and
enter the link url below space.
You can also specify a target frame in which
the linked page will be displayed.
Just select "..in new target frame"
and choose the mode from _blank, self, _parent, top,
and other target. If your choice is other target,
you have to specify the target frame name by yourself.
|
| |
| 7.
HTML output menu. |
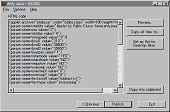 |
Here is the final menu. By now,
you have already built the Anfy object. |
| All you have done is reflected
on the HTML code here, which you need to copy & paste to
your desired HTML document with respective .class files. This
can be done very simply.
Click "Copy all files to..."
button and specify a destination file name, say, home.html
to which the HTML code will be output and the necessary .class
files will be copied to the same folder.
Or, you can copy the code and use it with
your preferred HTML editor. In this case, never forget to
copy the necessary .class files and images!
NOTE:
In the 1.4 release, we have added a new feature,
namely Active Desktop support. By pressing "Set as
active desktop item", you can see Anfy applets
locally on your desktop. This works as a screensaver, but
could be rather CPU intensive.
NOTE2:
Though it isn't obliged, you are greatly encouraged
to use our Anfy banner provided in the archive and link
to our site (http://www.anfyteam.com). This adds your web
site to the growing Anfy community!
|
|
| For more information, please consult
the documents for each applet. |
| |
|
|
|
|
| |
|
 |
 |

