 |
 |
|
 |
 |
 |
|
|
Applet
Tutorials: Wheel menu
|
|
|
| |
| Wheel menu applet |

|
|
This applet provides one of the most
strange menu around. Well, it's a joke to actually add
this menu to your web page, however, it's still fun
to play with it!
[For more technical
information about the available parameters, click
here.]
Most parameters are self-explanatory
and you can always see brief description of each parameter
by moving the mouse pointer over the
wizard.
|
 |
Before start editing
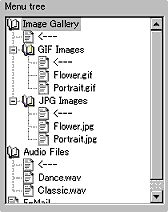
the menu, you should plan the structure of the menu
for your site carefully. Creating the site structure
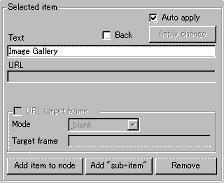
on Anfy wizard is simple. Add and remove items
with item names and associated URL and text. |
|
 |
Optionally
you can specify a frame in which a link is opened.
To do this, check the "URL target frame
box" and select the target from "mode"
menu. |
|
You can also add your original
frame name at "Target frame"
after choosing "other target"
at "mode". Urls can be email
addresses or file names as usual.
One thing you have to make sure
is that you always add at least one "back"
item to each node. Without this users can't go
to upper trees. After add an item, check "back"
box and you have got one back item enabled, which
is shown with a left arrow sign.
Whenever you make changes to the
menu tree, you need to click "Apply change"
button, unless you have checked "Auto
apply" box.
|
 |
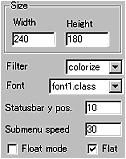
Next, decide the applet
size, filter and font.
Filters consist of smoothing filter and
colorise filter and choose one of them or
disable the filter. As for fonts, we provide
two types of unique 3D fonts. Then, decide
if you want the menu texts to be extruded
by checking "Flat" box.
If you would like the menu to appear in
a small new window, check "Float
mode" box.
|
|
|
Next, set status bar y position,
which designates length from the top of the applet
in pixel.
"Submenu speed"
stands for the speed of submenu appearance. A
higher value (up to 100) results in faster move.
|
| Floating
menu mode |
| If you have selected floating menu
mode, a new configurator appears when you click
"Next" button. (See below.) When
you activate this mode, the applet size itself can
be as small as 1 pixel, but MUST NOT be zero so
as to embed the applet to your HTML document. |
 |
| Set the floating window size (Width,
Height) and give the initial position when a window
first appears. You can set the name of the window.
If you would like to see the menu window always
appear on top of other windows, check "Always
on top box", otherwise leave it unchecked. |
|
|
|
|
We have only discussed about the wheel
menu specific parameters. For generic parameters, please
read wizard section.
Proceed to
the expert menu.
|
|
|
|
|
|
| |
|
 |
 |

