 |
 |
|
 |
 |
 |
|
|
Applet
Tutorials: Tree menu
|
|
|
| |
| Tree menu applet |
 |
|
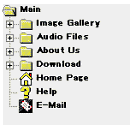
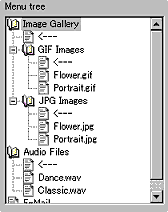
This applet provides a Explorer style
menu tree with good functionality. This may be one of
the most useful applet in real world.
[For more technical
information about the available parameters, click
here.]
Most parameters are self-explanatory
and you can always see brief description of each parameter
by moving the mouse pointer over the
wizard.
|
 |
Before start editing the
menu, you should plan the structure of the
menu for your site carefully. Creating the
site structure on Anfy wizard is simple.
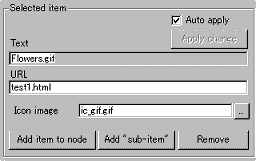
Add and remove items with item names and
associated URL and text.
Since the ver 1.4, the tree
items can be named with non-English fonts.
To achieve this, you need to select your
desired character set at the "character
set" parameter box.
|
 |
In the example
shown left, Japanese (Shift-JIS) is selected.
Then, appropriate code will be added in the
final document within a <meta> tag. |
|
We currently provide the
following list of character sets, but if
you manually edit <meta> tag, you
should be able to use others too.
|
Arabic (ISO) iso-8859-6
Arabic (Windows) windows-1256
Baltic (ISO) iso-8859-4
Baltic (Windows) windows-1257
Chinese (Traditional) big5
Chinese (Simplified) gb2312
Chinese (Simplified HZ) hz-gb-2312
Cyrillic (ISO) iso-8859-5
Cyrillic (Windows) windows-1251
European (Central, ISO) iso-8859-2
European (Central, Windows) windows-1250
European (Western, ISO) <-- default
iso-8859-1
Greek (ISO) iso-8859-7
Greek (Windows) windows-1253
Hebrew (ISO) iso-8859-8
Hebrew (Windows) windows-1255
Japanese (Shift-JIS) x-sjis
Japanese (JIS) iso-2022-jp
Japanese (EUC) x-euc-jp
Korean (ISO) iso-2022-kr
Korean (euc-kr) euc-kr
Latin 3 (ISO) iso-8859-3
Thai (ISO) iso-8859-11
Thai (Windows) windows-874
Turkish (ISO) iso-8859-9
Turkish (Windows) windows-1254
Ukrainian (KOI8-RU) koi8-ru
Vietnamese (Windows) windows-1258
|
Those who use non-English
(non-Latin) fonts should know how to handle
non-Latin fonts in HTML. For example, you
add in the <head></head> tag,
<meta http-equiv="content-type"
content="text/html; charset=iso-8859-1">
if Latin fonts are used.
However, in the case of Latin fonts, most
people tend to use default character set
and may not explicitly state this. The wizard
automatically outputs this tag for you!
|
|
 |
Unlike
other menu applets, you can't specify a unique frame
for each link in the tree menu. |
|
Instead, you can open all linked pages in your
selected frame. This is achieved by skip two menu
pages and find the regcode
menu.
Whenever you make changes to the
menu tree, you need to click "Apply change"
button, unless you have checked "Auto
apply" box.
|
 |
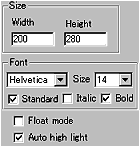
Next, decide the applet
size and the background image. Then
select a text font, and font size. Fonts
can be italic or bold faced. By default,
you select one font from Courier, Helvetica,
Dialog, Times Roman. These are standard
fonts and even if you want to type in non-Latin
letters, such as Japanese, Greek and Hebrew,
these four fonts can be used.
|
|
This is achieved by automatically,
so you don't really have to set non
standard fonts in any circumstances, however,
by unchecking "standard"
box, you are allowed to select one from
all the available system fonts.
Note.
Using non-standard font
causes unexpected results in other people's
system. When you do thits, you must know
what you are doing.
"Auto high light"
lets the text highlighted when a mouse pointer
is over it.
If you would like the menu
to appear in a small new window, check "Float
mode" box.
|
|
 |
Now you set the
speeds of opening and closing tree nodes at
"Open" and "Close".
If you add quite many items, a current applet
height may not provide enough space to display
all items. |
|
|
If this is the case, a scroll
bar appears at the right side of the applet like
Windows scroll bar. You can decides the width
of this scroll bar at "Scrollbar"
parameter.
You can even add a border line
around the applet with your selected value for
the "Border" parameter.
|
 |
Next,
you set bouncing of tree items when they are
mouse-selected with one click. |
|
| Items show damped oscillation when
they are opened or closed. Bouncing "Close"
and "Open" represent the numbers
of bounce when an item is either being closed or
opened. With "Gravity" parameter,
ranging 0 to 100 you control how explicitly items
bounce, while "Amplitude" parameter
decides the maximum amplitude of the bounce. Since,
this is a damped oscillator, the maximum amplitude
is the initial amplitude. |
 |
Then,
set colours for texts, scrollbar, background,
etc. |
|
|
"Text" colour
is the item text colour displayed as default.
Once you select an item, "Selected"
item colour replaces the default colour for the
item. "Scrollbar" colour is the
colour for the scrollbar and the border of the
applet area.
"Background"
colour and "Selected Background"
colour respectively represent the default colour
for the background and the colour replaced the
default one when an item is mouse-selected.
"Filter" colour
is somewhat different from other colour settings.
This colour is used to filter all icon images
to decide which will be shown as transparent.
If you use provided icons, you should not change
the default transparent colour, white.
Note that if you load transparent
gif images as icons, be sure to set appropriate
transparent colour.
|
|
| Floating menu
mode |
| If you have selected floating menu mode,
a new configurator appears when you click "Next"
button. (See below.) When you activate this mode, the
applet size itself can be as small as 1 pixel, but MUST
NOT be zero so as to embed the applet to your HTML document. |
 |
| Set the floating window size (Width,
Height) and give the initial position when a window first
appears. You can set the name of the window. If you would
like to see the menu window always appear on top of other
windows, check "Always on top box", otherwise
leave it unchecked. |
|
|
|
We have only discussed about the tree
menu specific parameters. For generic parameters, please
read wizard section.
Proceed to the
expert menu.
|
|
|
|
|
|
| |
|
 |
 |

