|
 |
|
 |
|
 |
|
|
Applet
Tutorials: Lens deformation
|
|
|
| |
|
Lens
applet
|
 |
|
This applets generates a moving lens
over a selected image. You can move this magnifying
glass freely using your mouse pointer; otherwise, let
it move by itself! The interactive placement feature
of the lens is the best way to employ this applet.
[For more technical
information about the available parameters, click
here.]
Most parameters are self-explanatory
and you can always see brief description of each parameter
by moving the mouse pointer over the
wizard.
|
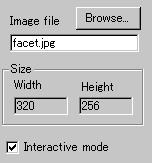 |
First, select an image to which the lens effect
is going to be applied. The applet
"Width" and "Height"
are automatically entered when you specify the
image.
|
|
You can also check "Interactive mode"
box, if you would like the lens controlled by
the mouse pointer.
|
 |
Now define the lens' property. You set the lens
size at "Lens width", which is
in fact a radius of the lens in pixel. Then, define
the magnification power of the lens at "Zoom
factor".
|
|
A value of 0 gives no magnification, while higher
values generate higher magnification effect.
|
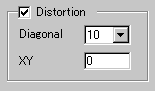 |
Another important choice is
"Distortion" effect. If you
leave this parameter unchecked, the magnification
is plain. |
|
|
This is not the case in using real world lenses.
Since a lens has a spherical figure, light coming
through near the edges of the lens, more or less,
tends to be distorted.
There are two types of distortion parameters:
(1) diagonal distortion, and (2)
XY crosswise distortion.
If you want a perfect spherical distortion, set
"Diagonal" value at 10 and "XY"
value at 0. Otherwise, choose any value between
5 and 20 for "Diagonal"and a
value between -40 and 40 for "XY",
and explore the result.
|
|
|
|
|
We have only discussed about the lens
specific parameters. For generic parameters, please
read wizard section.
Proceed to the
textscroll menu if you have checked the textscroll
box; otherwise go to the expert
menu.
|
|
|
|
|
|
| |
|
 |
|