 |
 |
|
 |
 |
 |
|
|
Applet
Tutorials: Bumpy mapping
|
|
|
| |
| Bumpy mapping applet |
 |
|
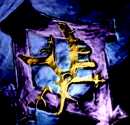
This applet gives an effect of a moving
light source over a bumpy surface, that casts shadow
onto a selected image. You can use two separate images
for the screen and the bumpy filter respectively. Or,
alternatively, use a single image for both purposes.
The latter can reduce the necessary download file size
quite effectively, although good use of two separate
images can create a stunning effect.
[For more technical
information about the available parameters, click
here.]
Most parameters are self-explanatory
and you can always see brief description of each parameter
by moving the mouse pointer over the
wizard.
|
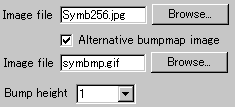 |
First, look at the left picture, there are two
fields in which you specify image files.
|
|
The lower file entering space
is enabled only when you check "Alternative
bumpmap image" box. So, these upper and
lower images represent the screen and the bumpy
filter respectively. If you want to reduce the
total download size, leave "Alternative
bumpmap image" box unchecked.
Next, decide the power of the
bumpy filter by selecting a number from the "bump
height" pull-down menu. A higher value
results in a bumpier shadow cast over the screen.
|
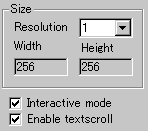 |
The applet "Width"
and "Height" are automatically
entered when you specify the screen image and a
"Resolution" value. "Resolution"
is a zooming parameter. |
|
For instance, the value 2 gives
twice as large an applet size as the screen size,
while the value 1 changes nothing.
Then you decide if textscroll
function is enabled by checking "Enable
textscroll" box. You can also
check "Interactive mode" box,
if you would like the light source controlled
by the mouse pointer.
|
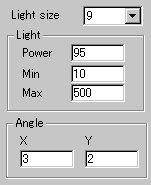 |
Secondly, you
define light source values. An integral value
n (>1) for "Light size"
gives the size of the light source as nth
power of 2. For instance, If your choice of
the value is 9, the light source would be
2^9 * 2^9, i.e., 512 * 512 pixels in size. |
|
|
Once you select a "Light
power" value from 1 to 100, you need
to set the contrast at "light Max"
and "Light Min". "Light
Max" and "Light Min"
take values ranging between 1 and 511. Choose
values so that the difference of them is very
high.
Note: A value for "Light
Max" must be higher than a value for
"Light Min".
Finally, set the light source
angle at "AngleX" and "AngleY".
These parameters represent the velocity of light
source movement relative to respective XY co-ordinates.
Higher values mean higher speed.
|
|
|
|
|
We have only discussed about the bump
specific parameters. For generic parameters, please
read wizard section.
Proceed to the
textscroll menu if you have checked the textscroll
box; otherwise go to the expert
menu.
|
|
|
|
|
|
| |
|
 |
 |
