 |
 |
|
 |
 |
 |
|
|
Applet
Tutorials: Anfy3D Light
|
|
|
| |
| Anfy3D applet limited
version |
 |
|
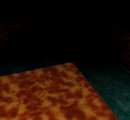
This applet provides a limited version of Anfy 3D, a set of
Java™ applets capable of realtime 3D rendering. This
version, called "light", only renders selected
texture-mapped objects with fog and realistic lightning
effects. The available obbjects are sheet, sphere and
cone. If you need more objects or want to visualise
your own 3D scenes, visit our
site and download Anfy 3D full version.
[More technical
information about available parameters can be found
here.]
Most parameters are self-explanatory
and you can always see brief description of each parameter
by moving the mouse pointer over the
wizard.
|
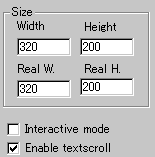 |
First of all, define the actully displayed applet
size and its internally calculated size at "Width",
"Height", "Real W"
and "Real H".
Then you decide if textscroll
function is enabled by checking "Enable
textscroll" box.
|
|
You can also check "Interactive mode"
box, if you would like the light source controled
by the mouse pointer.
|
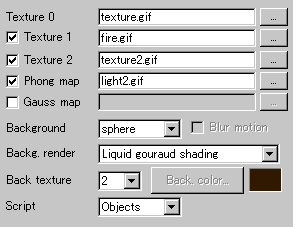 |
Next, set five texture
images at respective texture name. Texture0,
1, 2 are ordinary textures. |
|
If you only use one texture, set it at number
0 and leave the rest blunk.
This will reduce the total download time. Set
phong map if you require phong rendering.
Likewise, set gauss map if gauss rendering
is used. These rendering modes are quite popular
in 3D world.
Note that all texture images must be sized at
either 64*64 or 128*128 for internal optimisation.
Next you can decides the background effect as
a choice from black, sphere and
colour. If your choice is black, blur
motion effect can be used for rendering objects.
If your choice is colour, then, decides your desired
colour from colour dialog. If your choice is sphere,
you need to select a rendering option from 15
different rendering or shading modes. Some of
them are quite alien for those who are unfamiliar
with 3D modelling, but it's not too difficult
to see the difference when you test one by one.
The available options for background rendering
are:
|
0 Plain texture
1 Gouraud shading
2 Phong shading ** NOTE: "phongmap"
must be loaded
3 Gaussian phong shading ** NOTE:
"gaussmap" must be loaded
4 Transparent (light)
5 Transparent (medium)
6 Liquid texture
7 Liquid gouraud shading
8 Liquid phong shading ** NOTE: "phongmap"
must be loaded
9 Liquid transparent
10 Reflects mirror view ** NOTE:
texture is ignored, a mirror must exists
11 Particles ** NOTE: texture is
ignored
12 Darker plain texture
13 Metal shading ** NOTE: "phongmap"
must be loaded
14 Environment mapping
|
When you've selected the background rendering
option, you then have to choose the texture
number for the rendering.
Next, you can select a type of forground animation
from either labyrinth or objects.
This choice will decide the following parameters
to some degree. Labyrinth scrips control the 3D
labyrinth animation, while objects script rotate
selected objects.
|
 |
Here, you set fog
effect by specifying the starting and finishing
point of the effect. |
|
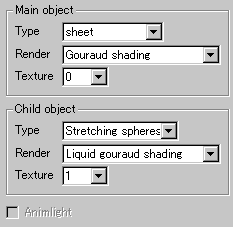 |
Now, you have to set up foreground
objects. There are two types of them: main
objects and child objects. You
can select either sphere, sheet,
or cone as a main pobject, while troids,
stretching spheres, or cones can be the child
objects. |
|
|
Once you select objects for both main and child,
next you select a respective render type. The
same 14 render types for background is available
for objects.
Next, select the texture number for respective
objects.
If your choice of script type was "labyrinth",
"Animlight" effect is available
for your choice. Check it if you want.
|
 |
If your choice of script was "objects",
you are able to control the rotation velocity
of the objects, high/low shadow effect,
mirror effect and light balls effect at
respective parameters shown left.
Next, if your choice of main objects is
a sheet, the following parameters are activated
shown below left. "Height"
and "Width" represent the
height and width of the sheet, while N
height faces and N width faces
stand for how many divisions to the sheet
are made both vertically and horizontally.
|
|
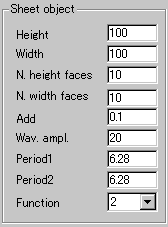 |
"Add" parameter
controls the waving animation of the sheet,
together with the wave amplitude parameter
and the periods 1&2 of the vertical
waving and horizontal waving respectively.
Finally, there are three possile wave functions
available for your choice. |
|
|
|
|
|
We have only discussed about the anfy3d
light specific parameters. For generic parameters, please
read wizard section.
Proceed to the
textscroll menu if you have checked the textscroll
box; otherwise go to the expert
menu.
|
|
|
|
|
|
| |
|
 |
 |
